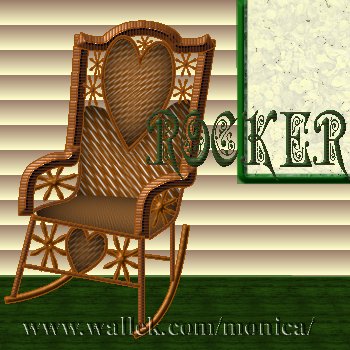
Wicker Rocker
Here is another wicker tut using selections. This was created for a particular person. She kept asking when I'd do a wicker rocking chair. Please save your work often. You may also find PSP crashes less when you clear your PSP cache folder and empty the clipboard and command history.

Sources
You will need these supplies to complete this tutorial.

- Open a new, transparent 243x347 16.7 million color image.
- Add new layer, Rocker. Selections->Load my 01rocker.sel file. Fill with color #974E07. (You may find that the brush tool
 works better than the flood
  tool for small areas.) Keep selected.
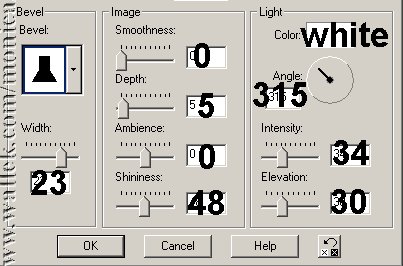
 - Add the following Effects->3D Effects->Inner Bevel as shown. Select none.

- Add new layer, Brace. Load my 01Bbrace.sel file. Fill with same color and apply same bevel. Select none.
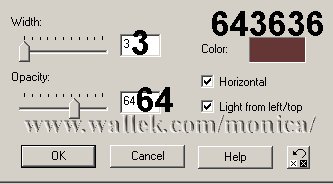
- Add new layer, Backlegs. Load my 02backlegs.sel file. Fill with same color and apply same bevel. Add Horizontal Blinds. Select none.

- Add new layer, Seatbase Wicker. Load my 03seatbasewicker.sel file. Open my seatbase.psp file and copy it. Paste into the selection. Select none.
- Add new layer, Back Wicker. Load my 04backwicker.sel file. Open my seatback.psp file and copy it. Paste into the selection. Select none.
- Add new layer, Back. Load my 05back.sel file. Fill with same color and apply same bevel. Add Horizontal Blinds. Select none.
- Add new layer, Top Back. Load my 05Btopback.sel file. Fill with same color and apply same bevel. Add Vertical Blinds. Select none.
- Add new layer, Side Details. Load my 06sidedetails.sel file. Fill with same color and apply same bevel. Select none.
- Add new layer, Side Trim. Load my 07sidetrim.sel file. Fill with same color and apply same bevel. Add Horizontal Blinds. Select none.
- Add new layer, Arms. Load my 08arms.sel file. Fill with same color and apply same bevel. Add Horizontal Blinds. Select none.
- Add new layer, Front Details. Load my 09frontdetails.sel file. Fill with same color and apply same bevel. Add Horizontal Blinds. Select none.
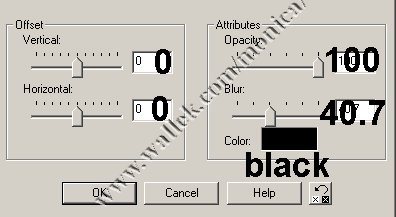
- Add new layer, FH Wicker2. Load my 10fhwicker2.sel file. Fill wicker2.jpg pattern. Invert and apply the drop shadow. Select none.

- Add new layer, Vertical. Load my 11Avertical.sel file. Fill with same color and apply same bevel. Add Horizontal Blinds. Select none.
- Add new layer, Braces. Load my 11Bbraces.sel file. Fill with same color and apply same bevel. Add Vertical Blinds. Select none.
- Add new layer, BH Wicker2. Load my 12bhwicker2.sel file. Fill with my wicker2.jpg. Invert selection and apply drop shadow. Select none.
- Add new layer, Back Details. Load my 13backdetails.sel file. Fill with same color and apply same bevel. Add Horizontal Blinds. Select none.
- Now, move the Seat Back layer below your Seat Base layer.
- You can save this and merge it for tubing. To turn this chair white: Use the Colorize feature set to 0,0. Then use Gamma Correction to lighten the chair to white. For more information about Colorize, please visit my Colorizer tutorial.


PSP7 tool icons are from MaMaT's icon tubes.
"PSP" refers to
CorelTM Paint ShopTM Pro®.
The individual creators own the copyrights and/or trademarks on their respective software filters, fonts, presets, Quick Guides, scripts, magazines, and images/banners which are mentioned or appear on these pages.
Customizable layout provided by Blue Robot CSS layouts. Note that I changed the colors, background and customized the CSS for my site.
© Copyright 2001-2011, Monica Wallek, All rights reserved.
Using my tutorial, means you agreed to these usage terms. All page elements, tutorials, and explanatory and sample graphics belong to me except where otherwise noted.
