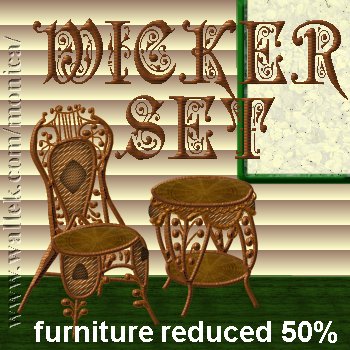
Wicker Set
Font used in image above is called Preciosa. With all the new Victorian homes from the other Dames, I was inspired to create some wicker furniture for the porch. Hopefully, this repetitive use of inner bevels and blinds effect will teach you something new or at least remind you of these tools when you do try your own creations from scratch. Because the images are large, you will need to clear you clipboard and command history frequently. Saving your work after each step is an excellent idea as well. For those who prefer to create their own vectors, I used the ellipse and lines for both wicker pieces. As a final note, you may find some tiny detail areas easier to fill with a large paint brush ![]() instead of the flood
instead of the flood ![]() tool.
tool.

Sources
You will need my zip file here of wicker tile and the selections themselves.

Chair
- Open a new 300x500 transparent 16.7 million color image. Before we go any further, PLEASE SAVE after EVERY step! We won't go into how many times PSP died on me while creating this lesson.
- Set your foreground color to #974E07.
- Add a new layer, Right Rear Leg.
- Load o1rearleg.sel and flood fill with foreground color.
- Keep selected and apply the following Inner Bevel. Keep selected.
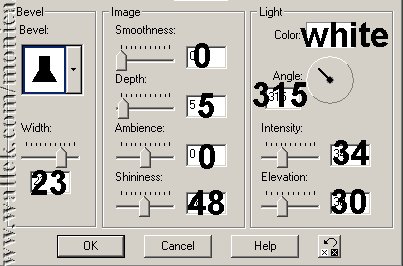
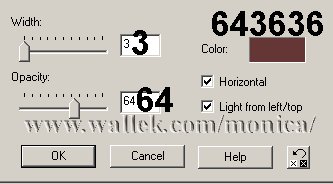
- 6. Add Effects->Texture->Blinds as shown. Note we will keep all settings but swap the horizontal check box on and off. Select none.
- Add new layer, Chair Brace.
- Load 02brace.sel. Fill. Apply same inner bevel. Apply Vertical blinds. Select None.
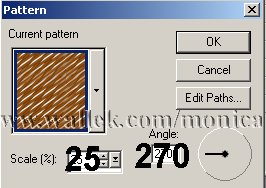
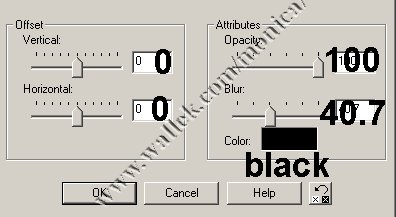
- Add new layer named Wicker2. Load 03wicker2.sel. Open my MWwicker2.jpg tile and flood fill with that pattern as shown. Keep selected and invert. Apply drop shadow as shown. Select None.
- Add new layer, legsA. Load 04legsA.sel. Fill with same color you've been using. Apply inner bevel and then Horizontal blinds.
- Add new layer, legsB. Load 004legsB.sel. Fill with same color you've been using. Apply inner bevel and then Vertical blinds.
- Add new layer, BackA. Load 05backA.sel. Fill with same color you've been using. Apply inner bevel and then Horizontal blinds.
- Add new layer, BackB. Load 05BackB.sel. Fill with same color you've been using. Apply inner bevel and then Vertical blinds.
- Add new layer, BackC. Load 05backC.sel. Fill with same color you've been using. Apply inner bevel and then Vertical blinds.
- Add new layer, BackD. Load 05BackD.sel. Fill with same color you've been using. Apply inner bevel and then Horizontal blinds.
- Add new layer, Back Rim. Load 06backrim.sel. Fill with same color you've been using. Apply inner bevel and then Vertical blinds.
- Add new layer, Seat. Open my seat.psp file. Load 07seat.sel. Copy the seat and paste it into the seat selection.
- Add new layer, Front Rim. Load 08frontrim.sel. Fill with same color you've been using. Apply inner bevel and then Vertical blinds.
- Add new layer, Wicker3. Load 09wicker3.sel. Fill with that same wicker pattern size changed to 15. Invert and apply same drop shadow as before.
- Now, move the BackC layer up above the BackD layer on your layer palette.
- Save your chair.

Table
- Open a new 300x400 16.7 million color transparent image.
- Add a new layer, RR Leg.
- Set your foreground color to #974E07. (Same color as for the chair.)
- Load 01rrearleg.sel and flood fill with the foreground color. Keep selected.
- Apply the same inner bevel as for the chair. Apply Horizontal blinds as before. Select none.
- Add a new layer, LR Leg. Load 02lrearleg.sel .
- Flood fill and apply bevel and blinds. Select none.
- Add a new layer, Back Rims. Load 03backrims.sel. Fill, apply bevel and Vertical blinds. Select none.
- Add a new layer, Shelf. Open my shelf.psp file. Load 04Ashelf.sel. Copy and paste the shelf into the seat.sel. Select none.
- Add a new layer, Top. Open my top.psp file. Load 04BTop.sel. Copy and paste the shelf into the seat.sel. Select none.
- Add a new layer, Shelf Rim. Load 05shelfrim.sel. Fill, apply bevel and Vertical blinds. Select none.
- Add a new layer, LFront Leg. Load 06Lfrontleg.sel. Fill, apply bevel and Horizontal blinds. Select none.
- Add a new layer, RFront Leg. Load 07Rfrontleg.sel. Fill, apply bevel and Horizontal blinds. Select none.
- Add a new layer, Wicker2. Load 08Wicker2.sel. Fill with my wicker2 pattern set to 25% and angle 270. Invert selection and apply same drop shadow as chair as shown. Select none.

- Add a new layer, Circle Trim. Load 09circletrim.sel. Fill, apply bevel. Select none.
- Add a new layer, Clam Trim. Load 10clamtrim.sel. Fill, apply bevel. Select none.
- Add a new layer, Top Trim. Load 11upperfrontfrontrim.sel. Fill, apply bevel and Vertical blinds. Select none.
- Add a new layer, Spirals. Load 12spirals.sel. Fill, apply bevel and Vertical blinds. Select none.
- You'll want to save this with layers and possibly tube your table.


PSP7 tool icons are from MaMaT's icon tubes.
"PSP" refers to
CorelTM Paint ShopTM Pro®.
The individual creators own the copyrights and/or trademarks on their respective software filters, fonts, presets, Quick Guides, scripts, magazines, and images/banners which are mentioned or appear on these pages.
Customizable layout provided by Blue Robot CSS layouts. Note that I changed the colors, background and customized the CSS for my site.
© Copyright 2001-2011, Monica Wallek, All rights reserved.
Using my tutorial, means you agreed to these usage terms. All page elements, tutorials, and explanatory and sample graphics belong to me except where otherwise noted.
