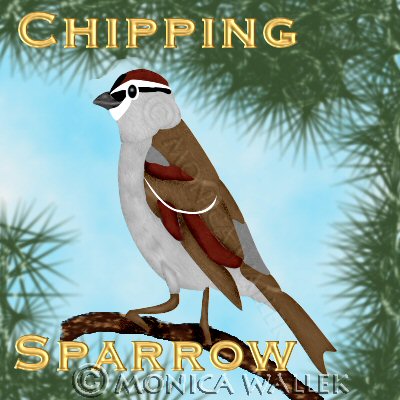
Chipping Sparrow PSP7-8
At least 14 sparrow varieties appear in Texas, but only seven appear regularly in my area, plus the imported European House Sparrow. You'll be using my canvas file and the colors file in PSP7 or 8 to create a Chipping sparrow. After following my other bird tuts, you won't be surprised to learn you use the alpha channel selections, lighten, darken, smudge and fill tools. (If you were surprised, you might consider following the cardinal, roadrunner, or hummingbird tuts first.)

Sources
You will need my canvas and colors files available here.
PSP7 users please note that the Lighten/Darken settings are found in the Retouch tool options. You may wish to use the soften setting to give your finished image a look more like the PSP8 finished image.
Keep in mind that your results will vary every time you try using the lighten, darken, smudge and soften tools.
Remember to save often!
Why you won't see any specific Lighten/Darken settings.
The more you repeatedly go over an area with either brush, the darker it gets with darkening and lighter it gets with lightening. If we pretend I give you the exact settings I used, you still won't get the exact same results I got *that* particular time. I get very different results with the same settings on the same day. I suspect those of you uncomfortable with this tool and other similar tools do not trust your own eyes. You will need to trust your own artistic judgement. Once I learned to do that myself, my own retouch tool group work improved to my own eyes. I will give you rough settings: hardness and density less than 50.

You will need to open the canvas file and the color swatch file in whichever version of PSP you will be using.
- Make sure you are on the 01 layer. Load the matching selection from alpha channel. Flood with the lighter brown color. Use the Lighten and Darken tools to apply highlights and shadows to legs. Smudge if needed. Selections->Select none.
- Make sure you are on the 02 layer. Load the matching selection from alpha channel. Flood with the lightest gray color. Use the Lighten and Darken tools to apply highlights and shadows to the area. Smudge if needed. Selections->Select none.
- Make sure you are on the 03 layer. Load the matching selection from alpha channel. Flood with the lightest gray color. Use the Lighten and Darken tools to apply highlights and shadows to the area. Smudge if needed. Selections->Select none.
- Make sure you are on the 04 layer. Load the matching selection from alpha channel. Flood with the lighter brown color. Use the Lighten and Darken tools to apply highlights and shadows to the area. Smudge if needed. Selections->Select none.
- Make sure you are on the 05 layer. Load the matching selection from alpha channel. Flood with the middle gray color. Use the Lighten and Darken tools to apply highlights and shadows to the area. Smudge if needed. Selections->Select none.
- Make sure you are on the 06 layer. Load the matching selection from alpha channel. Flood with the lighter brown color. Use the Lighten and Darken tools to apply highlights and shadows to the area. Smudge if needed. Selections->Select none.
- Make sure you are on the 07 layer. Load the matching selection from alpha channel. Flood with the lighter brown color. Use the Lighten and Darken tools to apply highlights and shadows to the area. Smudge if needed. Selections->Select none.
- Make sure you are on the 08 layer. Load the matching selection from alpha channel. Flood with the darker brown color. Use the Lighten and Darken tools to apply highlights and shadows to the area. Smudge if needed. Selections->Select none.
- Make sure you are on the 09 layer. Load the matching selection from alpha channel. Flood with the middle gray color. Use the Lighten and Darken tools to apply highlights and shadows to the area. Smudge if needed. Selections->Select none.
- Make sure you are on the 10 layer. Load the matching selection from alpha channel. Flood with the darkest gray color. Use the Lighten and Darken tools to apply highlights and shadows to the area. Smudge if needed. Selections->Select none.
- Make sure you are on the 11 layer. Load the matching selection from alpha channel. Flood with the lightest gray color. Use the Lighten and Darken tools to apply highlights and shadows to the area. Smudge if needed. Selections->Select none.
- Make sure you are on the 12 layer. Load the matching selection from alpha channel. Flood with the darker brown color. Use the Lighten and Darken tools to apply highlights and shadows to the area. Smudge if needed. Selections->Select none.
- Make sure you are on the 13 layer. Load the matching selection from alpha channel. Flood with black. Selections->Select none.
- Make sure you are on the 14 layer. Load the matching selection from alpha channel. Flood with black. Selections->Select none.
- Make sure you are on the 15 layer. Load the matching selection from alpha channel. Flood with white. Selections->Select none.
- Apply any further smudging or highlights to your image layers.
- Click on the eye layer and unhide it. Merge visible.


PSP7 tool icons are from MaMaT's icon tubes.
"PSP" refers to
CorelTM Paint ShopTM Pro®.
The individual creators own the copyrights and/or trademarks on their respective software filters, fonts, presets, Quick Guides, scripts, magazines, and images/banners which are mentioned or appear on these pages.
Customizable layout provided by Blue Robot CSS layouts. Note that I changed the colors, background and customized the CSS for my site.
© Copyright 2001-2011, Monica Wallek, All rights reserved.
Using my tutorial, means you agreed to these usage terms. All page elements, tutorials, and explanatory and sample graphics belong to me except where otherwise noted.
