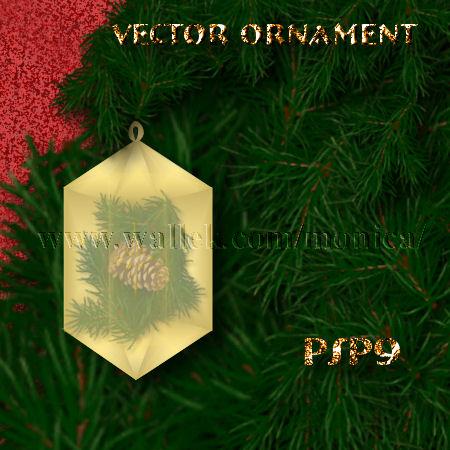
Monica's Vector Ornament PSP9
Several people have requested more PSP9 vector tutorials. You'll be building an 18-sided ornament from scratch using edited vector shapes (rectangle-6, polygon-12, ellipse-2, and symmetric-2, and several lines) and both solid color and various gradients. The finished image will actually be 1 vector layer for export. Before you panic, we build each side individually and use several tricks to avoid redrawing items completely.
You will be comfortable node editing simple shapes after completing this image. This image is based on an actual holiday tree ornament I have.

Sources
Words of caution to brand new PSP9 users: This should not be your first tutorial or even your first vector tutorial. You should already be familiar with and comfortable using layers and their opacities, groups, blends, moving and duplicating. You should also be able to change foreground and background styles (solid, gradient, pattern, texture, and NULL). Although you only move around nodes of preset shapes and do not actually change the node types themselves, adjusting the nodes flush up against each other seamlessly on adjacent shapes is not an easy task. You will need time and patience to create a finished image similar to mine. Because I focus on creating/editing vectors to make the ornament, I see no reason to also offer a selection version of this tutorial. That would defeat the purposes of the tut which are to stretch your node editing abilities and challenge you creatively.
You'll need my ornament supplies available here. File includes my gradient and color swatches.
You'll need to place the gradient files in your c:\My documents.....\My PSP Files\gradients folder. Make sure your file locations point to this folder in addition to the folder under Programs.
I created a custom vector toolbar for myself based on the Corel "Create An Art Media Toolbar" found here (486 KB .pdf file). I've noticed I don't hunt the menus and sub menus for out-of-sight tools and I'm more likely to actually USE the full range of features. 

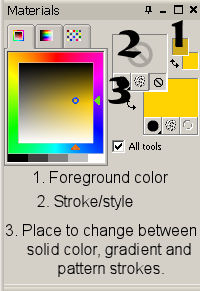
You will need to open a new 350x350 (or larger; as long as you can easily see your shapes) 16 million color transparent image and the color swatch file in PSP9. The strange letters refer to the colors used- Base, Shadow, Lid, and Highlight and the order we'll use them.
- Set your foreground color to null and background color to the solid Base color. Choose the Rectangle Shape Tool->Rectangle. Make sure the "create as vector" and "show nodes" boxes are checked in the tool options.{F4 if you don't see the options already.} Draw out a 100-150 px long rectangle roughly in the center of your image.

- With the same settings, draw out a rectangle on each side of the first one.
- We need to lengthen the long edge on each rectangle that isn't touching the center. On each of your new rectangle sub layers, right click the sublayer name and choose "convert to path" so we can actually edit the nodes. Switch to the pen tool, set it in edit mode. Pretend the pen tool is a selection tool and draw a selection around the two outside right nodes. Hold down the ctrl key while mouse is over that top node and drag mouse up to create an even angle top and bottom. Select none. Repeat for the other outside node pair and be sure you drag the mouse the same distance.

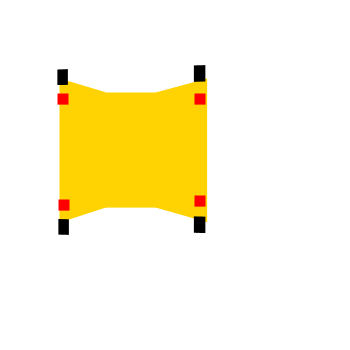
- Eyeball your rectangles zoomed in. Do you see any space or holes between them? If you do, re-enter edit mode and adjust them so nodes on adjoining images meet perfectly. (We are trying to avoid the issue quilters have when the points of their pattern pieces do not line up correctly in the quilt.) Misalignments now will equal strange gaps in your exported shapes later when you use them in larger sizes. Now is a really good time to save the file if you haven't already.
- Time to create a helpful set of lines for placing the Lid shapes. Add a new vector layer named Base Guides. Choose the Pen tool with lines and poly lines mode(a line between two points is what is on the icon). Set foreground/stroke to red and background to null. Set line width to 1. Starting with the outside top corner of your left rectangle, click your mouse along the top corners of those rectangles- click and release, click and release for next node, click and release for next node, click and release for top right outside corner. Select none. Switch to the pen tool edit mode, select all 4 nodes in your line/contour, and set Duplication X to -50 and Duplication Y to 50. Then right click and choose Edit->Duplicate Selected with Offset. Right click to reach the Edit Context menu. Now, choose Transform->Flip. Move the new creation down to mark the bottom edges of your rectangles. Select none. Note that it should fit perfectly.
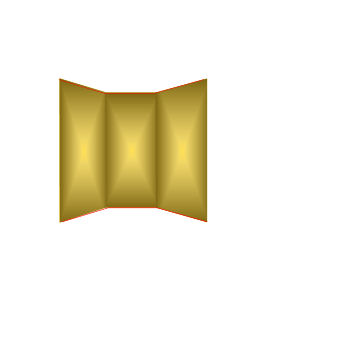
- Duplicate your Base Guides layer. Rename it to Lid Guides and change color from red to black. Select one contour of four nodes. Move the top black contour down below the lower red one until the two outer nodes meet to form a flattened hexagon. Move the remaining black contour up to above the red one. Hide your Base Guides layer. Select your vector layer with your rectangles. Save your file.
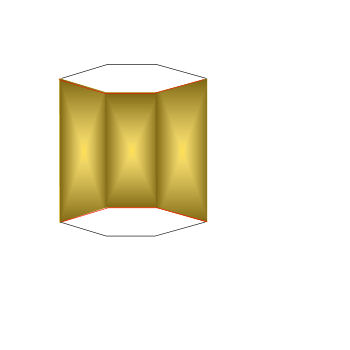
- Next, we'll work on those top three triangles which touch our rectangles. Choose the Symmetric Shapes Tool->polygon and set the number of sides to 3.

- Starting above your first rectangle, draw out a tall triangle. Right click on the "New Symmetric Shape" sublayer and choose "convert to path" so you can edit the triangle. Make sure it fully meets the top of the rectangle.
- Draw out the remaining triangles to each side and convert each to path. You'll need to switch to pen tool and edit mode to finesse the triangle tops to meet properly.

- Zoom in and adjust the other triangle corners so they meet each other properly and the tops of the rectangles. Save the file.
- Repeat the same steps for the three bottom triangles. Remember, they point down, away from their matching rectangles.
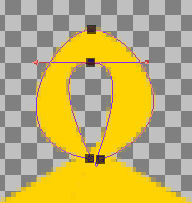
- We don't want to forget to create the hole for a hook or ribbon. From the Ellipse Shape tool option, choose a circle. Draw out a smallish circle at the point of the center triangle. Right click the ellipse sublayer and choose "convert to path" so you are able to edit the nodes. Moving the relevant nodes, create an upside-down "C" and bring the ends of the "C" together. I just pushed the bottom node up nearly to its partner, and then pulled the two tips down to the triangle and to each other. Depending on your original ellipse size, you might want to tug and or move the node handles around for a smoother oval. On each node of this ellipse, pulling a handle increases the curve to left or right of node.

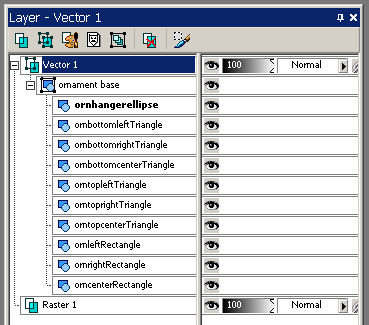
- Now, I'm sure you're ready for a break from editing. On your layers palette (F8) Click the "+" beside the vector layer name- likely Vector1. You should see all the sub layers we just added (ellipse, triangles and rectangles). Press your Shift key and hold it down until told to release it. Left-click on each sublayer until all are selected. Release the shift key. Right click on any one selected sublayer. Choose "Group" from the pop up menu. Name this group "Base".
- Now might be a good time to rename all the sub layers in that Base group from their shape names to their actual function in our future shape so we can export this as a shape later and easily use it without warnings about duplicate names from PSP. This will also keep you from becoming confused after doing the next step. Save the file.
- Right mouse click->Layer->duplicate. You should have a new vector layer above the one you just finished. Rename the group "Shadow" on the copy layer. We'll use what we already created, and just change the fill on each sublayer.
- Choose the Vector Object Selection tool. Left click on of your "Shadow" sublayers. Right click to bring up the context menu and choose "Properties". Set background to Gradient (foreground to null) and load my MWornShadow gradient and choose the rectangle gradient style. Invert box should be checked. The "Shadow" sublayer should now have the new gradient fill.
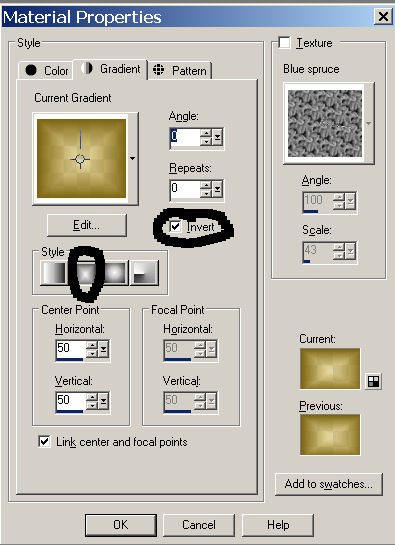
- Change to the new "Shadow" fill on every "Shadow" sublayer. Save your file.
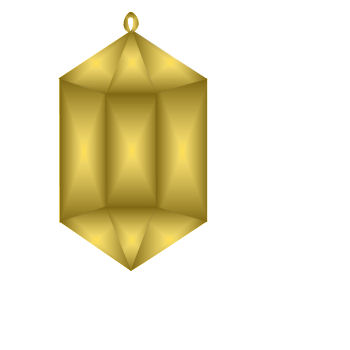
- Drag the finished "Shadow" group down into the original vector layer. Select the vector copy layer. Delete layer. The group needs to be above your base group. Save the file again.
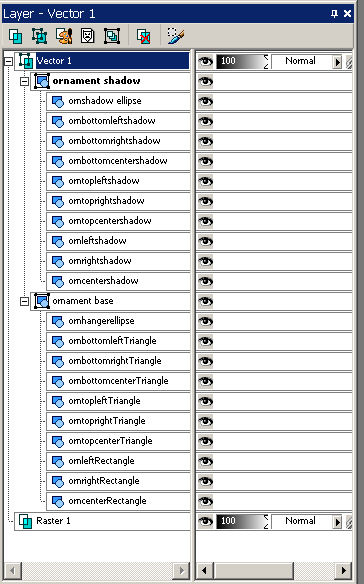
- You'll want to make the Lid Guides layer visible. Top line is for upper edges of rectangles.
- Duplicate the layer with your Base and Shadow groups. In the layer copy, delete all groups except the shadow group.Rename Shadow to Lid. Move Lid down into the vector layer with your other shapes. Delete empty vector copy layer. Save file. Open Lid group.
- The shapes in this Lid group should be filled with my MWornLid gradient, inverted and rectangular style.
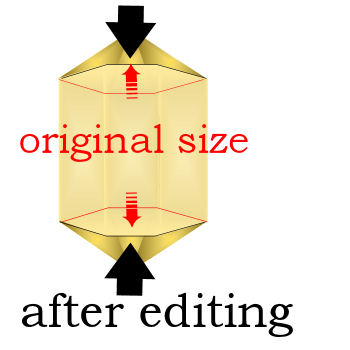
- You need to edit the center rectangle on the Lid group to align between the top and bottom black guides. Continue aligning rectangles. Align triangles same way. Be sure to zoom in and fix any huge overlaps or shortfalls between shapes. Save the file. I've shown the Lid rectangles after they were expanded to the new height. I also show what the various parts of each group look like when colored separately. No, that is not something you need to do.
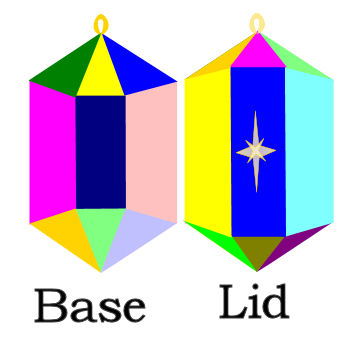
- I created one final shape with 2 symmetric star shapes for the Lid. Just adds to the "vintage plastic" look. Choose 4 sides and radius 12.87. Set foreground to Base color (B) and background to Highlight Color(H). Width=1.0 (This refers to stroke, if you were wondering.) Draw out a small star.

- Change radius to 6.43, draw out a smaller star- 1/2 to 1/4 size of first star. Note that you could also use the same settings as above.
- Click on the Vector Object selection tool and using the center handle, rotate the tiny star so its points are between the points of the larger star's points. Position the tiny star so its center is aligned with the bigger star's center.
- Group the star sublayers and name "Center Star". Rename the sublayers to "big star" and "tiny star".

- At this point, I had created a group for the Lid groups and another group for the Base groups. Then I grouped those groups and named them "Ornament". Hide the Guide layers.
- You can Export your finished ornament shape. To export the Ornament, select the ornament group. Choose FILE->Export->Shape.. and type in a meaningful name in the pop up file box. I used "MW_ornament".
- To use your new shapes, choose your new shape from preset shapes options. Move the Lid group to its own vector layer above the ornament layer. Slide the layer opacity for the Lid layer to 64%. Add raster layer(s) between the two vector layers for your tubes or other ornament filler. I used some old Jasc/Corel tubes of tree branches and pinecones and erased the excess tubes outside of the box area.
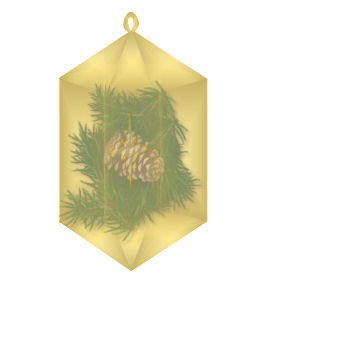
- This was my fourth or fifth try and I finally got the perspective nearly perfect.("Nearly", because the Base side rectangles should be narrower since they are at an angle to us.) Don't get discouraged!
- If you are stumped on what to place in the ornament, my birds, Pracken's pine branch, Pracken's snowflake, or any other holiday tut or even non-holiday items. For those needing inspiration, visit PSPLinks.com for more inspiration.


PSP7 tool icons are from MaMaT's icon tubes.
"PSP" refers to
CorelTM Paint ShopTM Pro®.
The individual creators own the copyrights and/or trademarks on their respective software filters, fonts, presets, Quick Guides, scripts, magazines, and images/banners which are mentioned or appear on these pages.
Customizable layout provided by Blue Robot CSS layouts. Note that I changed the colors, background and customized the CSS for my site.
© Copyright 2001-2011, Monica Wallek, All rights reserved.
Using my tutorial, means you agreed to these usage terms. All page elements, tutorials, and explanatory and sample graphics belong to me except where otherwise noted.
