Filmstrip Negative Tutorial
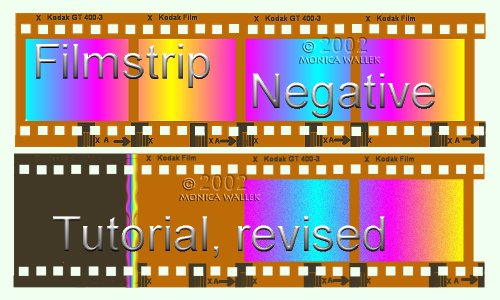
Revision Note: For those who think this lesson looks different from their last visit, you are correct. I finally had time to give my very first lesson a much-needed overhaul. Hopefully, you will enjoy the reduced typos, greatly improved selection files and the extra goodies. Thank you for dropping by.
Inspiration for this PSP May Challenge tutorial came from Will Shak's scanned film negative. This tutorial is based on my own creation from scratch drawing in PSP7 and staring at my negatives.
You should be familiar with PSP7 tools [layers, selections, loading selections from disk, fills, using gradients] and Windows [enough to download and save the files I am providing in the specified locations]. I assume you know how to resize your completed graphics and make tubes.

Supplies
Grab your lesson supplies here.
- MW Film grad.jgd: place in Jasc gradient folder or where ever you keep your downloaded gradients. Please don't try to open it.
- .sel files: do not try to file->open these in in PSP or windows, you will get an error! But what are they? They are saved invisible pieces that I provide so you won't need to draw them from scratch. Place these in the selections folder you created for another tutorial OR create a folder named SELECTIONS and put them in it. Remember where you put this folder.

Do save often. It is maddening when PSP randomly decides to crash after a long, tedious step and you forgot to save anything at all. Means you start over from scratch!
- Open a new
 transparent background image 1000 x 300 with 16 million colors. You *must* resize this down later for posting your completed lesson to the group. For now, the extra size is handy while building this thing.
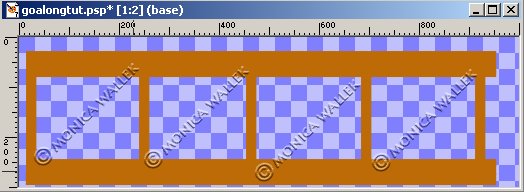
 - Add a new layer named Base. Go to SELECTIONS-Load from Disk and load MW Base.sel from your Selections folder.
- Fill
 selection with #BD6B08. Save
  your work as a .psp file.
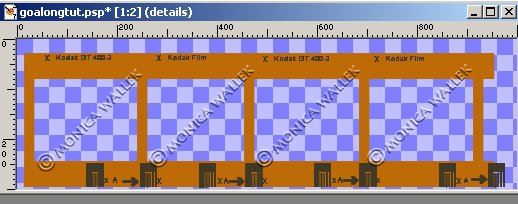
- Add a new layer named Details. Choose the film speed you want and then choose the selection with the matching name (100, 200, 400, or 800text.sel). Flood fill
 with #413925. Select none.
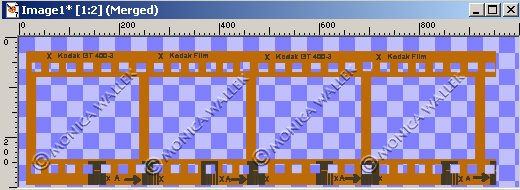
- Cleanup time! Merge Visible your layers. Now, load the MWBase.sel and invert it. Hit your delete key once. Select none. Load the MWholes.sel file. Hit the delete key once. Select none.
- Nearly done! At this point, you may want to save a .psp copy of this file for future tubing and other uses.
Processed Roll End
- Shift-D your image, if it isn't a copy already.
- Add a new layer named Gradient. Load MW Gradient.sel from disk. (Get the gradient style by clicking the little arrow in the top styles box and then click the striped box- see screenshot.)
 (Click anywhere in the big box except the arrow to get the gradient window. Choose MW Film grad from the list. See Screen Shot.)
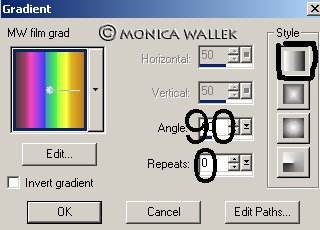
 Your palette and styles should now look like mine.
 - Flood Fill
 your selection and keep it selected. Save that work.
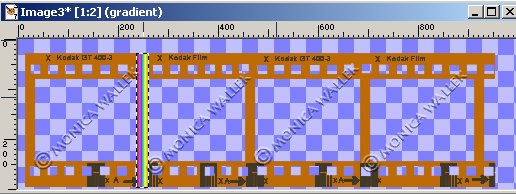
- Choose EFFECTS->Geometric and either RIPPLE or WAVE-- Your choice-- and play with the settings to get the chemical wash look.
Wave Effect Settings Horizontal Displacement Vertical Displacement Amplitude 1 0 Wavelength 20 1 Ripple Effect
- Amplitude: 5-10
- Wavelength: 30-40
- Horizontal Center: 20-50
- Vertical Center: 50
Select None. Save your work! (I reloaded the holes.sel file and hit delete to reopen the holes the gradient hid.)
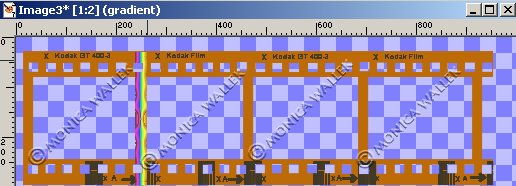
- To fill in the image holes and change the base color on the left side: On your merged layer, choose the color replacer tool
 . Make sure your foreground color is the dark color and the background color is the light color. Now, use the color replacer tool on the base area to the left of the gradient. Do not change the color to the right of the gradient. Use the magic wand
  to click in the center "window" on the dark side of the gradient. Go to Selections->Modify->Expand by 2. Fill the selection with the dark color. Select the first "window" on the light side, and fill with the lighter color. We are leaving the last full "windows" for your photos and a piece of a "window" empty. Select none. Save your work.
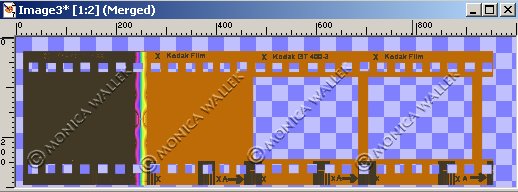
Adding your Photos
You would select an empty photo area and "Paste into Selection" on a NEW LAYER of a copy of your photo. (I add my images on new layers below the negative layer.) Merge visible after you've added your photos. Then, add a drop shadow if you wish.
Have fun playing with your new negatives.
For you filter junkies, now you have free reign on those poor photos. LOL.

Samples


PSP7 tool icons are from MaMaT's icon tubes.
"PSP" refers to
CorelTM Paint ShopTM Pro®.
The individual creators own the copyrights and/or trademarks on their respective software filters, fonts, presets, Quick Guides, scripts, magazines, and images/banners which are mentioned or appear on these pages.
Customizable layout provided by Blue Robot CSS layouts. Note that I changed the colors, background and customized the CSS for my site.
© Copyright 2001-2011, Monica Wallek, All rights reserved.
Using my tutorial, means you agreed to these usage terms. All page elements, tutorials, and explanatory and sample graphics belong to me except where otherwise noted.
