
Monica's Initial Tutorial PSP7
I was just playing with PSP and came up with this. Someone saw the result and asked for a tutorial so they could learn.
You can do the initial without extra filters, but you can also use your favorite BladePro or Super BladePro presets too.

Sources
Click here to download the supplies needed for this tutorial.
Font is from Listemageren's fonts and has 3 fonts. We will use Preciosa for this lesson. (These are posted within his distribution requirements. Please respect his usage terms.)
You are also welcome to consider any illuminated black and white letters or the ornate Celtic fonts as well. Some of the Celtic style frames might also work.
I am providing a PSP7 preset file- MW Initial Bevel.PBV . Place it in your JASC /Presets folder. It will not open or browse the normal way. Just copy it into the folder. I'm providing it so you won't need to squint at the tiny numbers in my screen shots.
You will need either your own metallic gradient or BladePro preset.
You'll need to find or create your own gradients since Mahogany has closed down her site.
- Open a new 400 x 400 transparent 16.7 million color image.
- Add new layer named Letter.
- Click on text tool
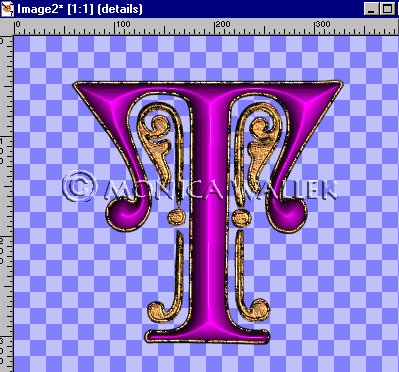
 and choose Preciosa font in size 275. Stroke is black, fill is white and floating and antialias are checked. Type in your uppercase letter. I did "T" for some reason. Select none.


- Duplicate the Letter layer and rename it Leaf. Hide your Letter layer for now, we'll get back to it later. Make sure you are on Leaf. Carefully delete the letter part, but leave the leaf ornaments. Hide this layer. Make Letter layer visible.
- Add a new layer Details. Click the text tool again and click in the window. Keep the same settings except change the Fill to NULL. Click ok and move
 the outline to line up with the letter layer below. Select None. Hide layer.
 - Click on Leaf layer and view it. Select both leaf things on the layer- black and white parts.
Gradient people: flood fill with your favorite gradient- choose your own settings. Add Effects->Noise 3% to smooth out the fake look. Select none.
S/BP people: Select none. Add your favorite metallic preset now.
Please keep in mind that most BladePro Presets were created using a white base, so you may want to flood fill the areas first with white.

- Click on and view your Letter layer now. Use the wand
 to select the white inside the letter. Go to Selections->Modify->expand by 2. That's just to be sure we fill the whole letter. Click on Fill tool
  and choose one of the following shades for your foreground color:
Fill your letter and keep selected.Colors with HTML Values Color Name HTML Code Red C00000 Orange F18403 Yellow C0C000 Green 00C000 Teal 00C0C0 Blue 0000C0 Purple C000C0 Magenta F1036E 
- Go to Effects->3D->Inner bevel and choose MW Initials Bevel.PBV from the drop-down window.

- Click on and view the Details layer. Apply the same BP preset or gradient (Remember to select what you want to fill first.) and noise as before. Apply the same inner bevel.
- Merge visible your Details and Letter layers.


The font I used in the lesson title image with Preciosa is a freeware font called Sidhe.
The patterns in "Red" and "Snow" letters are from Jane's PSP Tubes site. You'll find them in the "wallpaper" area under "Xmas".
Used a mask from Nanette's Place to make the frame and filled it with a copper gradient. Used same gradient on initials and same green treated with a bevel. I believe mask is from "Page 1, Set 1".


PSP7 tool icons are from MaMaT's icon tubes.
"PSP" refers to
CorelTM Paint ShopTM Pro®.
The individual creators own the copyrights and/or trademarks on their respective software filters, fonts, presets, Quick Guides, scripts, magazines, and images/banners which are mentioned or appear on these pages.
Customizable layout provided by Blue Robot CSS layouts. Note that I changed the colors, background and customized the CSS for my site.
© Copyright 2001-2011, Monica Wallek, All rights reserved.
Using my tutorial, means you agreed to these usage terms. All page elements, tutorials, and explanatory and sample graphics belong to me except where otherwise noted.
![]()