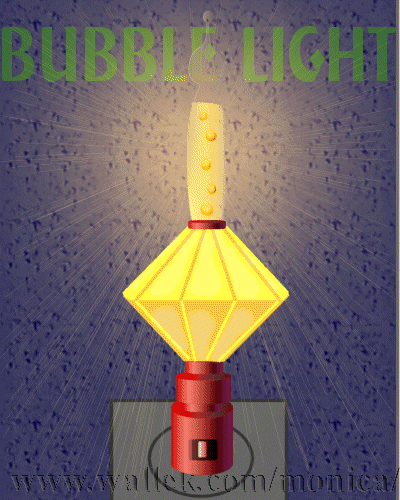
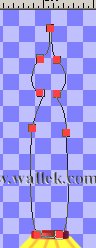
Vector Bubble Light
I was inspired by a catalog I received showing many cute bubble lights as night lights. The majority of this tutorial focuses on vectors. You will be using preset shapes and the line tool and editing some of them to create the finished image. I only use raster layers to create the shading and lighting effects shown. (Animation also requires raster layers.) Those new to vectors may want to consider trying other vector lessons first before trying this vector-intensive project. Things you should know before trying this lesson: grouping vector sublayers, changing vector properties, node editing, gradients, and other more basic PSP tools.

Sources
You must have PSP 7 for this lesson.
EVERYONE NEEDS TO CHECK THIS FIRST: Make sure your SAVE options are for PSP7 because PSP5 didn't have vectors and PSP6 compresses the vector layers into a single layer. Please make sure your settings are correct. If they aren't, you may get the "can't save vectors" message from PSP, or be unable to save your vector layers correctly.
Since you are creating this image from scratch yourself, this resulting image is yours. (I didn't provide any supplies I created for you.)
Ok. I cannot stress enough that you save your work often. This is a huge file size.
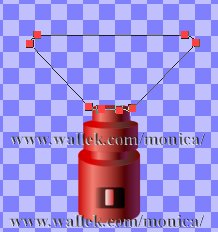
- Open a new, transparent 400x500 16.7 million color image. Save this as a .psp file.
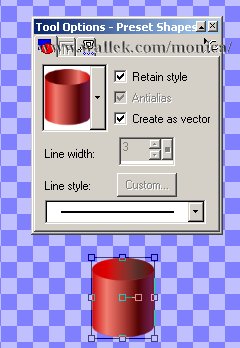
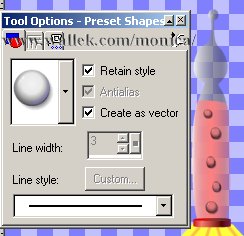
- Using the preset shape tool
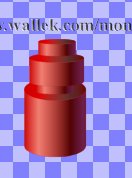
 , choose the red cylinder shape. Make sure your settings match mine. Draw out the bottom cylinder. You will need to open the Cylinder group and find the sublayer (near group top) that creates the shadow on top of cylinder. I used the vector selector
  to rotate the shadow as shown.
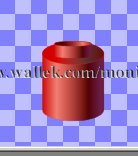
- DO NOT add a layer. Now, keep the same shape and draw out another thinner and shorter cylinder above the first one. Shadow rotation is not needed here.
- Same Layer, create another cylinder in the stack. This one should be almost as wide as your first one and about half as tall. Repeat that shadow rotation.
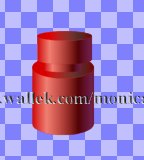
- You need to create this last cylinder and make it closer in size to your #2 cylinder. Repeat the shadow rotation.
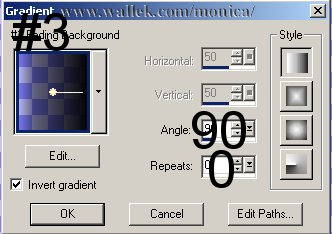
- Now, Change your Foreground Style to Null and set your Background style to Gradient #3 Fading gradient. Choose the settings to match mine. Your background color should be Black.
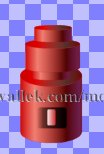
- Choose the Rounded rectangle shape. Settings as shown. Draw out the area for our switch. Nicely shaded even!
- Set your background color to white or light gray. Repeat step 7 for a smaller switch. Place this inside the darker rectangle.
- Time for a break from drawing. On your layer Palette, hold the shift key down while you click each cylinder and rectangle. Release the shift key, and right click again. Choose the "Group" option. You can rename the group by right clicking again and choosing rename. I named this group Light Base. If you like, you can rename the vector layer to something helpful as well. I used the same name as the group name.

- Create a New Vector layer, Base.
- Stop and think a bit now. You need to pick 2 contrasting colors for this layer and its parts. I chose #FFFF40 and #FCC142.
- Set your Foreground style to null and the background style to solid color. [Yellow] Keep the rounded rectangle as before. Click on the vector selector tool and choose Node edit. We will move the bottom two corners into the top cylinder area as shown.
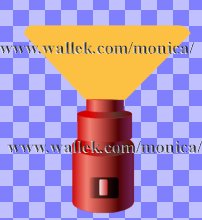
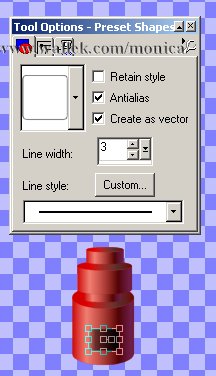
- Change your Foreground style to solid color and your background style to null. Foreground color should be your contrast color. Mine is orange. Using the Line tool
 set to Single line and Vector, draw lines similar to those I have. I used line width 3.

- Now you repeat steps 12 and 13, but make the edited part point up. Use the contrast color. Remember to set foreground to null for the shape, but change it back for the lines. And switch colors for the lines.
- Switch your shapes back to the cylinder. Add a new vector layer, I called mine Seal.
- Make a tiny thin cylinder for the seal around the tube.(Do *not* rotate shadow for this step.)
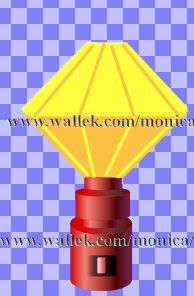
- Add a new vector layer, Tube. Change your background color to white. Set foreground style to null and background to that same #3 gradient. It should be white now. Draw an ellipse.
- Now get to where you can node edit. We are going to shape this oval into a candle and flame looking shape. Be patient... this took me good while too.
- Now, copy the vector. Create a new vector layer layer named Liquid. Paste your tube shape on this layer and carefully line it
 up with the layer beneath. Now you will edit this shape to match the smooth liquid I show.
 - Change the properties of your Liquid after setting your Foreground style to null, your background color to the color of your choice. Set the Background style to #3 Gradient again. Repeat should be 1 for this step only. I used #FEEDA0. (I changed my mind from the color shown in the screen shot.)
- Go back to the Tube layer. Choose the ellipse shape. Set your background color to white. Draw a small circle to sit on top of your tube. Repeat should be 0, but choose the round gradient option.

- Make Liquid your active layer again. Now add a new vector layer, Bubbles.
- Set your shape tool to the Drop shape. Use settings shown and draw 6 bubbles. Make them different sizes and not lined up.
- Save your hard work!
- Add a new Raster layer, Glow. Flood
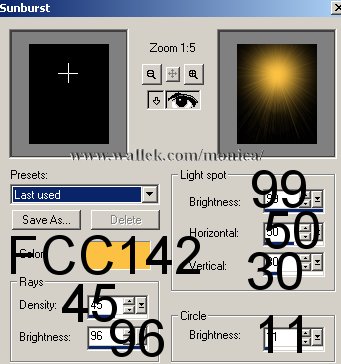
 the layer with black. Apply Effects->Illumination-> Sunburst and the settings shown. The orange looked good with my color choices. Feel free to change to another color to match your own color choices.
- On your Tube layer, click on each ellipse layer while holding down shift key. Under Selections, choose "raster selection from vector". Selections->Save to disk under a name you'll remember.
- Create a new Raster layer, Light. Selections->load from disk and choose that selection you just created. Flood selection with white.
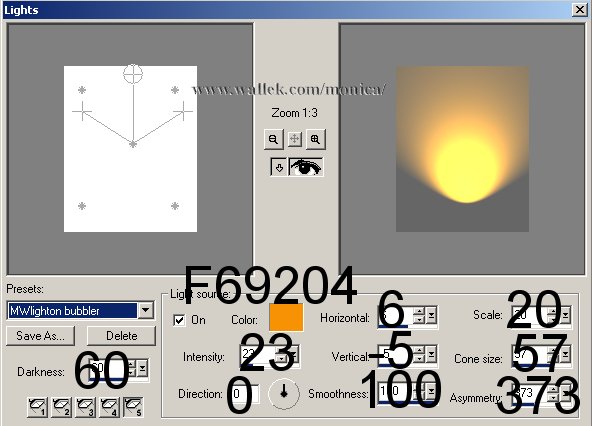
- Choose Effects->Illumination->Lights and the settings shown. Note you may need to adjust the Horizontal and/or Vertical values to fit your image. We are creating the light rays from the light.
- Create a new RASTER layer, Shading. Set your foreground color to white. Using the brush tool, apply some shading detail as shown.
- Now, we'll rearrange those layers and tweak their settings. Save this image.
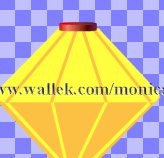
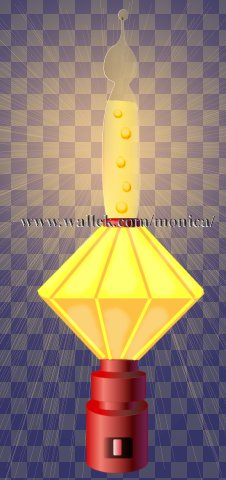
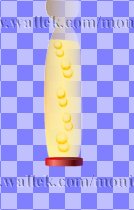
- Place your layers in the following order: (top to bottom)Seal, Tube, Bubbles, Liquid, Light, Shading, Base, Light Base, and Glow. Set layer opacity on Tube to 30%. Change Bubbles layer blend to Burn. Change Shading to 47% and Hard Light. Change Glow layer to 60%. Depending on your color choices, you may wish to play with these settings a bit more. Different colors of liquid give very different results with these settings! Save your changes. Make a shift D copy of your file. Close original file. This way, you can reuse your vectors and change colors as you wish.
- Convert your Vector layers to raster and save your copy with a different name. You have completed the lesson unless you choose to animate it. Please use optimization and check your file size (in KB) before attaching it to email and sending it in to the group. My file was nearly 400K and many of you noticed how slowly this page loaded. Be considerate and post it to a web page if you need to since most graphic groups have a 100K or less attachment limit.
To animate similar to mine:
- Duplicate the Bubbles layer. Rename it B2. Using the mover tool , move the B2 layer up slightly. If your top bubble is out of the liquid, cut it out and repaste it at base of liquid. We are recycling the bubbles. This is one time when shaking hands give better results. The bubbles look much better when they wobble a bit in animation.
- Duplicate the B2 layer and repeat the steps until you have one more B layer than the number of bubbles you made. Six bubbles = B7 layer. You did save all these changes to the .psp file, right? Good.
- For now, hide the numbered bubble layers only. This is your last chance to add any background layers you wish and resize the canvas. Save Copy AS light1.gif .
- Hide the Bubble layer but reveal B2 layer. Save COPY AS light2.gif .
- Continue hiding all bubble layers except next bubble layer until you have each layer in its own file. I had 7 gif files when I finished.
- Off to animate! Choose File->JASC Software Products->Launch Animation Shop.
- Choose File-> Animation Wizard if it didn't already appear.
- Press "Next" 4 times. Choose Add Image. Load your 7 images. Make sure they are in increasing order from top to bottom. (I numbered them so I could keep them in proper order.)
- Choose Next and Finish. Choose View-> Animation to see what you made.
- Save your animation. I usually name mine MWsomethininghereANI.gif so I can find the animated file again.
- Please use optimization and check your file size (in KB) before attaching it to email and sending it in to the group. My file was nearly 400K and many of you noticed how slowly this page loaded. Be considerate and post it to a web page if you need to since most graphic groups have a 100K or less attachment limit.


PSP7 tool icons are from MaMaT's icon tubes.
"PSP" refers to
CorelTM Paint ShopTM Pro®.
The individual creators own the copyrights and/or trademarks on their respective software filters, fonts, presets, Quick Guides, scripts, magazines, and images/banners which are mentioned or appear on these pages.
Customizable layout provided by Blue Robot CSS layouts. Note that I changed the colors, background and customized the CSS for my site.
© Copyright 2001-2011, Monica Wallek, All rights reserved.
Using my tutorial, means you agreed to these usage terms. All page elements, tutorials, and explanatory and sample graphics belong to me except where otherwise noted.
![]()