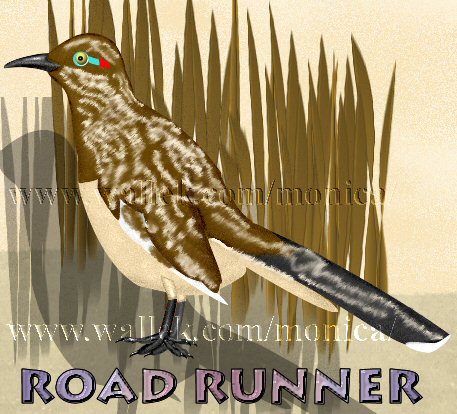
Roadrunner PSP7-8
This tutorial is by special request. I provide the canvas file with selections and bird eye, and you'll finish the image using the lighten and darken tools(v7 retouch), blur and soften tools. I had considered offering this tutorial as vector only, but the original vector image used 104 vector pieces. Didn't think many of you are quite *that* dedicated! Because of the large canvas size, SAVE OFTEN!
For the curious, roadrunners range across the southwest from the Mississippi River. They are originally from Mexico and are quite good at adapting to heat, but not snow. These birds eat snakes, scorpions, and poisonous spiders and catch their prey by chasing them at speeds of 20mph over various distances. As a child, I watched them drag race with cars down the highways.

Sources
You will need my supplies folder, which includes a sample of colors I used, and the canvas itself. When you open the canvas, immediately do a "Save As" and rename the canvas to work on a copy just in case a disaster happens to the original. Supplies are available here. For PSP7 users: lighten/Darken options are under the retouch tool which looks like a hand. The smudge tool is also an option of the Retouch tool.
Why you won't see any specific lighten/darken settings.
The more you repeatedly go over an area with either brush, the darker it gets with darkening and lighter it gets with lightening. If we pretend I give you the exact settings I used, you still won't get the exact same results I got *that* particular time. I get very different results with the same settings on the same day. I suspect those of you uncomfortable with this tool and other similar tools do not trust your own eyes. You will need to trust your own artistic judgement. Once I learned to do that myself, my own retouch tool group work improved to my own eyes. I will give you rough settings: hardness and density less than 50.

Open my MWrrcanvas.psp file. Also open the MWrrswatch.psp file. You will use the eye dropper tool to select the appropriate colors.
- Click on layer 01 r lower leg. Selections->Load/Save Selections->Load from Alpha Channel. Load the 01 selection named the same as the layer. Using the dark gray color, flood fill the selection. Keep selected and use the lighten/darken tool to add dimension. I used the darken setting around the edges, and the lighten tool in the middle. Selections->Select none.
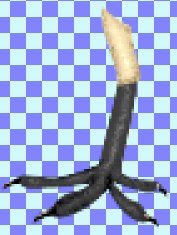
- Click on layer 02 r leg toes. Selections->Load/Save Selections->Load from Alpha Channel. Load the 02 selection named the same as the layer. Using the dark gray color, flood fill the selection. Keep selected and use the lighten/darken tool to add dimension. I used the darken setting around the edges, and the lighten tool in the middle. Selections->Select none.
- Click on layer 03 r leg claws. Selections->Load/Save Selections->Load from Alpha Channel. Load the 03 selection named the same as the layer. Using black, flood fill the selection. Keep selected and use the Effects->3D Effects->Inner Bevel with the Round setting. Selections->Select none.
- Click on layer 04 r leg thigh. Selections->Load/Save Selections->Load from Alpha Channel. Load the 04 selection named the same as the layer. Using the middle brown color, flood fill the selection. Keep selected and use the lighten/darken tool to add dimension. I used the darken setting around the edges, and the lighten tool in the middle. Selections->Select none.
- Click on layer 05 under bird. Selections->Load/Save Selections->Load from Alpha Channel. Load the 05 selection named the same as the layer. Using the middle brown color, flood fill the selection. Keep selected and use the lighten/darken tool to add dimension. I used the darken setting around the edges and in the middle at a huge brush size setting very lightly, and the lighten tool in the middle. Selections->Select none.
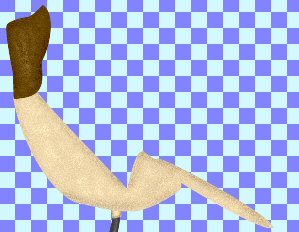
- Click on layer 06 breast. Selections->Load/Save Selections->Load from Alpha Channel. Load the 06 selection named the same as the layer. Using the dark brown color, flood fill the selection. Keep selected and use the lighten/darken tool to add dimension. I used the darken setting with a small brush size around the edges and in the middle at a larger brush size very lightly, and the lighten tool in the middle. Selections->Select none.
- Click on layer 07 tail. Selections->Load/Save Selections->Load from Alpha Channel. Load the 07 selection named the same as the layer. Using the dark gray color, flood fill the selection. Keep selected and use the lighten/darken tool to add dimension. I used the darken setting around the edges and the lighten tool in the middle. Selections->Select none.
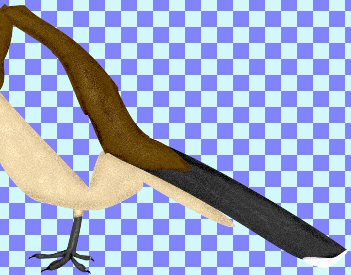
- Click on layer 08 tail tip. Selections->Load/Save Selections->Load from Alpha Channel. Load the 08 selection named the same as the layer. Using white, flood fill the selection. Keep selected and use the lighten/darken tool to add dimension. I used the darken setting around the edges. Selections->Select none.
- Click on layer 09 upper bird. Selections->Load/Save Selections->Load from Alpha Channel. Load the 09 selection named the same as the layer. Using the dark brown color, flood fill the selection. Keep selected and use the lighten/darken tool to add dimension. I used the darken setting around the edges and the lighten tool in the middle. Feel free to add the big brush darken setting in the middle of the tail. Selections->Select none.
- Click on layer 10 white wing. Selections->Load/Save Selections->Load from Alpha Channel. Load the 10 selection named the same as the layer. Using white, flood fill the selection. Keep selected and use the darken tool to add dimension. I used the darken setting around the edges. Selections->Select none.
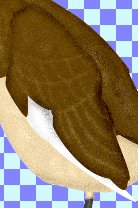
- Click on layer 11 wing. Selections->Load/Save Selections->Load from Alpha Channel. Load the 11 selection named the same as the layer. Using the dark brown color, flood fill the selection. Keep selected and use the lighten/darken tool to add dimension I used the darken setting around the edges and the lighten tool in the middle. Selections->Select none.
- Click on layer 12 beak. Selections->Load/Save Selections->Load from Alpha Channel. Load the 12 selection named the same as the layer. Using the dark gray color, flood fill the selection. Keep selected and use the lighten/darken tool to add dimension. I used the darken setting around the edges and the lighten tool in the middle. Selections->Select none.

- Click on layer 13 head. Selections->Load/Save Selections->Load from Alpha Channel. Load the 13 selection named the same as the layer. Using the dark brown color, flood fill the selection. Keep selected and use the lighten/darken tool to add dimension. I used the darken setting around the edges and the lighten tool in the middle. Selections->Select none.
- Click on layer 14 blue eye mark. Selections->Load/Save Selections->Load from Alpha Channel. Load the 14 selection named the same as the layer. Using blue, flood fill the selection. Selections->Select none.
- Click on layer 15 red eye mark. Selections->Load/Save Selections->Load from Alpha Channel. Load the 15 selection named the same as the layer. Using red, flood fill the selection. Selections->Select none.
- Click on layer 16 l leg lower. Selections->Load/Save Selections->Load from Alpha Channel. Load the 16 selection named the same as the layer. Using dark gray, flood fill the selection. Keep selected and use the lighten/darken tool to add dimension. I used the darken setting around the edges and the lighten setting in the middle. Selections->Select none.
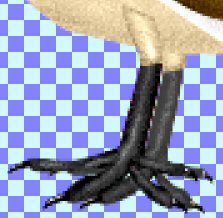
- Click on layer 17 l leg toes. Selections->Load/Save Selections->Load from Alpha Channel. Load the 17 selection named the same as the layer. Using dark gray, flood fill the selection. Keep selected and use the lighten/darken tool to add dimension. I used the darken setting around the edges and the lighten setting in the middle. Selections->Select none.
- Click on layer 18 l leg claws. Selections->Load/Save Selections->Load from Alpha Channel. Load the 18 selection named the same as the layer. Using the black, flood fill the selection. Apply the same inner bevel as before. Selections->Select none.
- Click on layer 19 l leg thigh. Selections->Load/Save Selections->Load from Alpha Channel. Load the 19 selection named the same as the layer. Using the middle brown, flood fill the selection. Lighten/darken as before. Selections->Select none.
- Click on layer 20 light markings. Selections->Load/Save Selections->Load from Alpha Channel. Load the 20 selection named the same as the layer. Using the lightest brown, flood fill the selection. Selections->Select none.
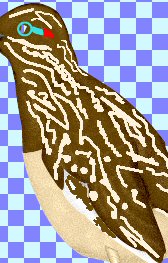
- Click on layer 21 dark markings. Selections->Load/Save Selections->Load from Alpha Channel. Load the 21 selection named the same as the layer. Using the dark brown, flood fill the selection. Selections->Select none.
- You will need to blend in slightly the various light markings and the brown spots. I used smudge set to size 5, hardness 23, step 7, density 34 and zoomed into the image. While I didn't adjust the blend modes or opacity, you are welcome to experiment.
- Click on the eye layer and make it visible. Merge all layers.
- Be Sure to Image->resize before sending to groups! We do not want to stress or crash any mail boxes out there.


PSP7 tool icons are from MaMaT's icon tubes.
"PSP" refers to
CorelTM Paint ShopTM Pro®.
The individual creators own the copyrights and/or trademarks on their respective software filters, fonts, presets, Quick Guides, scripts, magazines, and images/banners which are mentioned or appear on these pages.
Customizable layout provided by Blue Robot CSS layouts. Note that I changed the colors, background and customized the CSS for my site.
© Copyright 2001-2011, Monica Wallek, All rights reserved.
Using my tutorial, means you agreed to these usage terms. All page elements, tutorials, and explanatory and sample graphics belong to me except where otherwise noted.
